
Build a HelixOS module
Add your own pages, data and agent tools to HelixOS. Describe a module, let an agent build it, watch it live in Dev preview, and merge its pull request to put it in front of your team.
A module adds a new part to HelixOS. It has its own pages in the sidebar, keeps its own data, and gives your agents tools to work with that data. Candidate Search in Helix Recruiter is a module.
You don't need to know how modules work to build one. You describe what you want, an agent writes the code, and you decide what goes live. The short version:
- Describe it. Give the module a name and say what it should do.
- Watch it being built. An agent works in its own Helix sandbox. Turn on Dev preview to use its unfinished work inside HelixOS, live, before anyone else sees it.
- Review the pull request. Every change arrives as a pull request. Read what changed.
- Merge it. Merging puts the new version live for your organization.
Changing a module later is the same loop: ask for a change, preview it, merge it.
This guide walks through that loop inside HelixOS. The last section covers building a module with a coding agent like Claude Code on your own computer instead.
What you need
- A HelixOS workspace, such as Helix Recruiter, where you are an owner. Any member can ask for a module, but only owners can install it and use Dev preview.
- Optionally, a GitHub or GitLab account connected in Helix, if you want the module's code in your own repository. Without one, the code lives in Helix.
1. Create the module
Go to Modules and click New module.
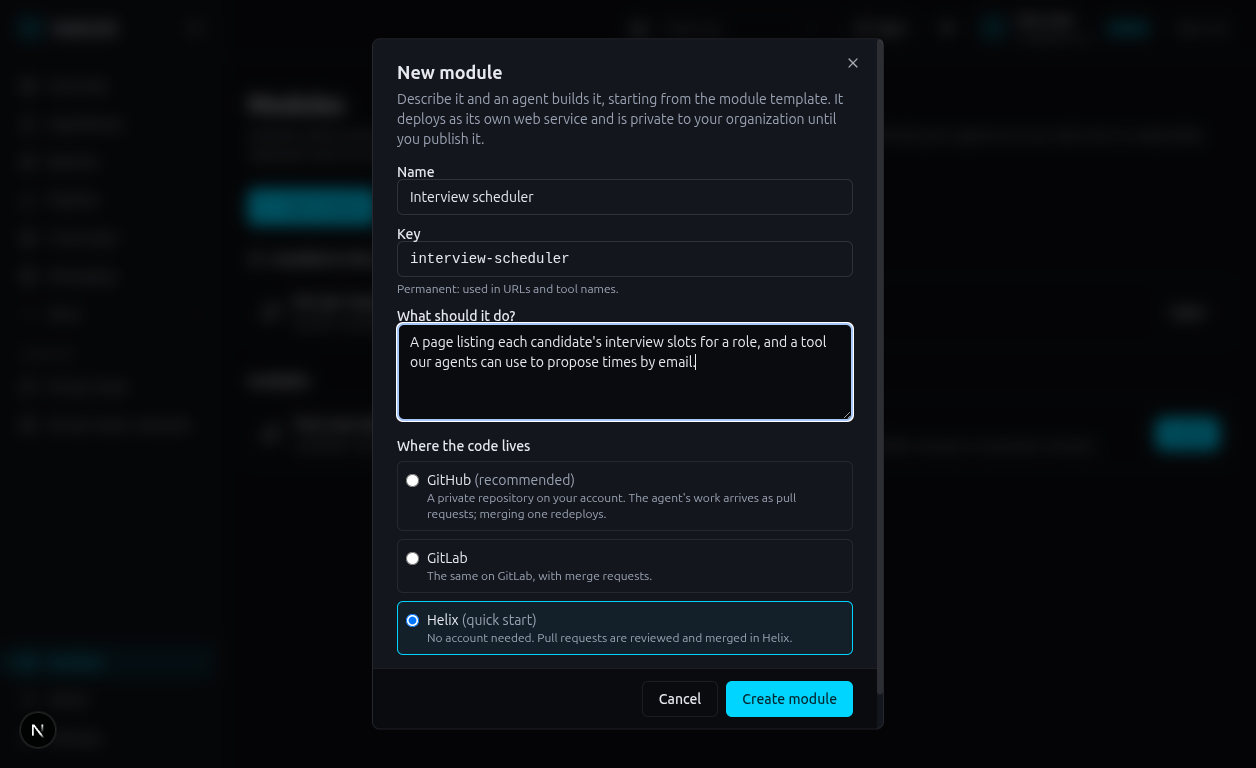
- Name is what people see in the sidebar. The key is filled in from it. It is permanent, because it appears in links and in the names of the module's agent tools.
- What should it do? is the brief for the agent. Say who uses it and what they do with it. You can be as rough as you like here: the agent writes a plan first, and you approve the plan before it builds anything.
- Where the code lives:
- GitHub or GitLab creates a private repository on your account (or one of your organizations) from the module template. You own it. If your account isn't connected yet, the dialog takes you to Helix to connect it, then you click Retry. You can also point at a repository you already have.
- Helix (quick start) keeps the code in Helix and needs no account. Pull requests are reviewed and merged in Helix itself.
Tick Skip the plan review only for small, obvious modules. Click Create module.
HelixOS now sets everything up: the repository, a Helix project, a web address for the module, and an agent task with your brief. The first version (an example notes page) is deployed straight away, so the module works within a few minutes.
2. Install it, and watch the agent
You land on the module's page. The strip at the top shows where the module is and highlights the next step.
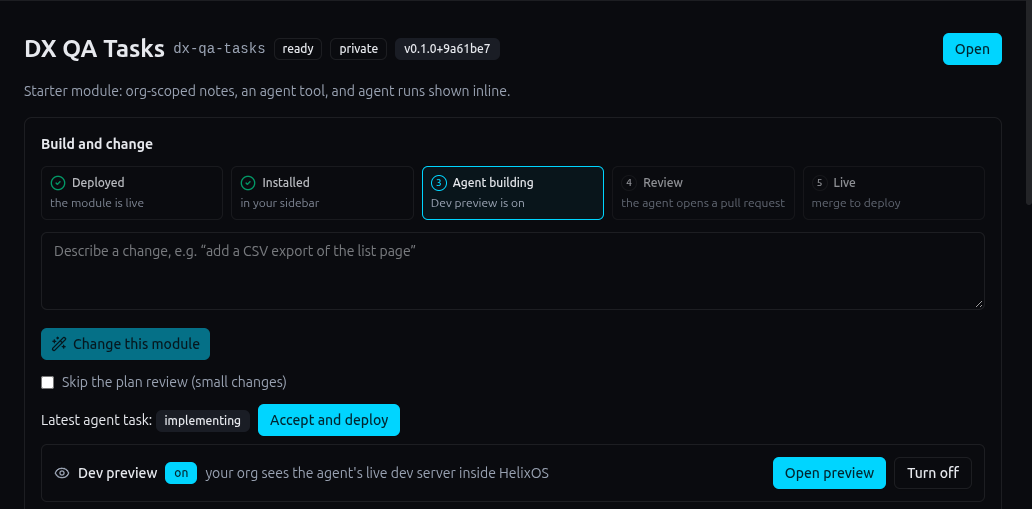
- Deployed: the first version is live.
- Installed: click Install it and approve what the module may do (for example, see the names of people in your organization, or start agent runs). It then appears in your sidebar. A module only shows up where it is installed.
- Agent building: the agent is working. Its desktop is embedded below on the same page, so you can watch it, chat to it, or approve its plan.
- Review: the agent has opened a pull request.
- Live: you merged it, and the new version is deployed.
3. Use the agent's work before it is merged
While the agent works, it runs the module in its sandbox with every change applied instantly. Dev preview shows you that copy, inside HelixOS, signed in as you.
On the module page, click Turn on next to Dev preview, then Open preview. You can also switch any time with the Production / Dev preview toggle at the top of the module.
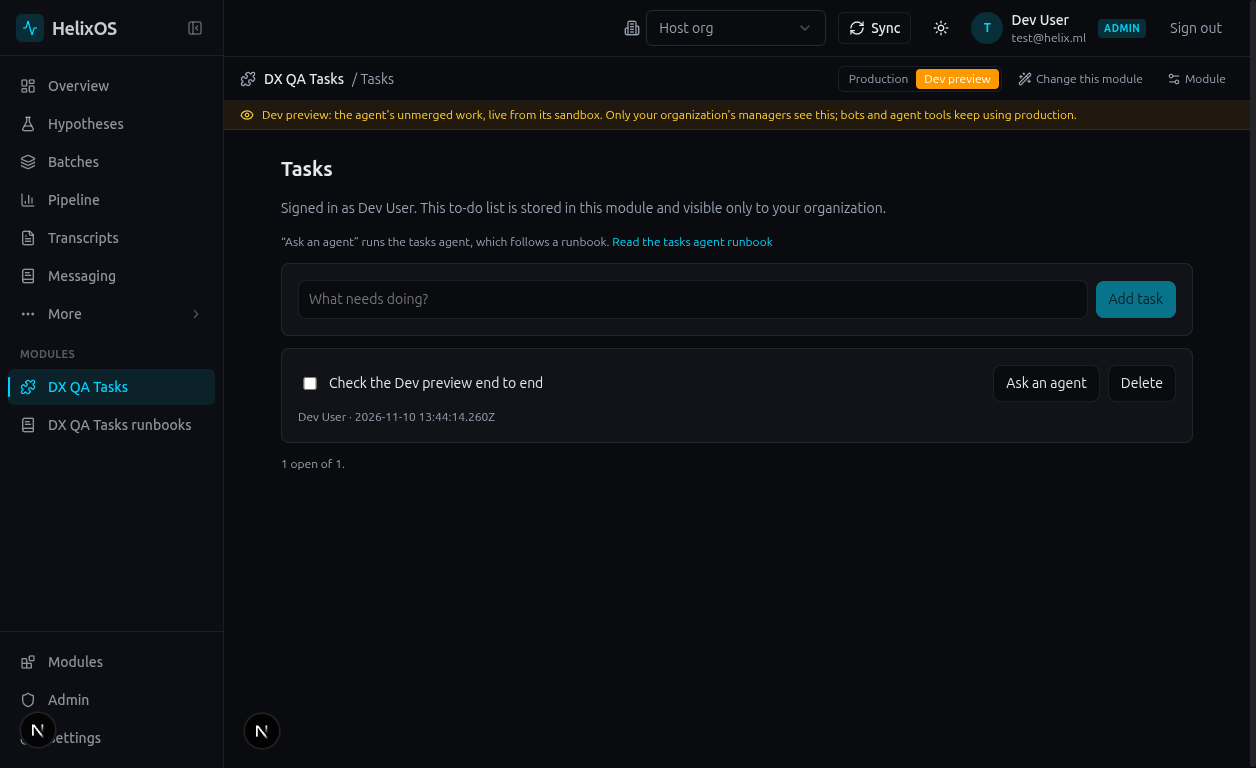
What to know about Dev preview:
- It is live. When the agent edits a page, it updates in front of you within seconds. Try the feature, tell the agent what's wrong in its chat, and watch it change.
- Only your organization's owners see it. Everyone else, including other organizations that installed the module, keeps seeing production.
- It is a sandbox. Data you create in Dev preview is test data in the agent's sandbox. Bots, scheduled runs and agent tools keep using the production module, so nothing you try in preview reaches real work.
- It switches itself off when the agent's task ends.
4. Review the pull request and merge
When the agent is done, it proposes a pull request. The module page links to it, and the build strip moves to Review.
- GitHub or GitLab: review and merge on GitHub or GitLab as you would any pull request.
- Helix: the pull request opens in Helix. It shows the description, every changed file, and a Merge button.
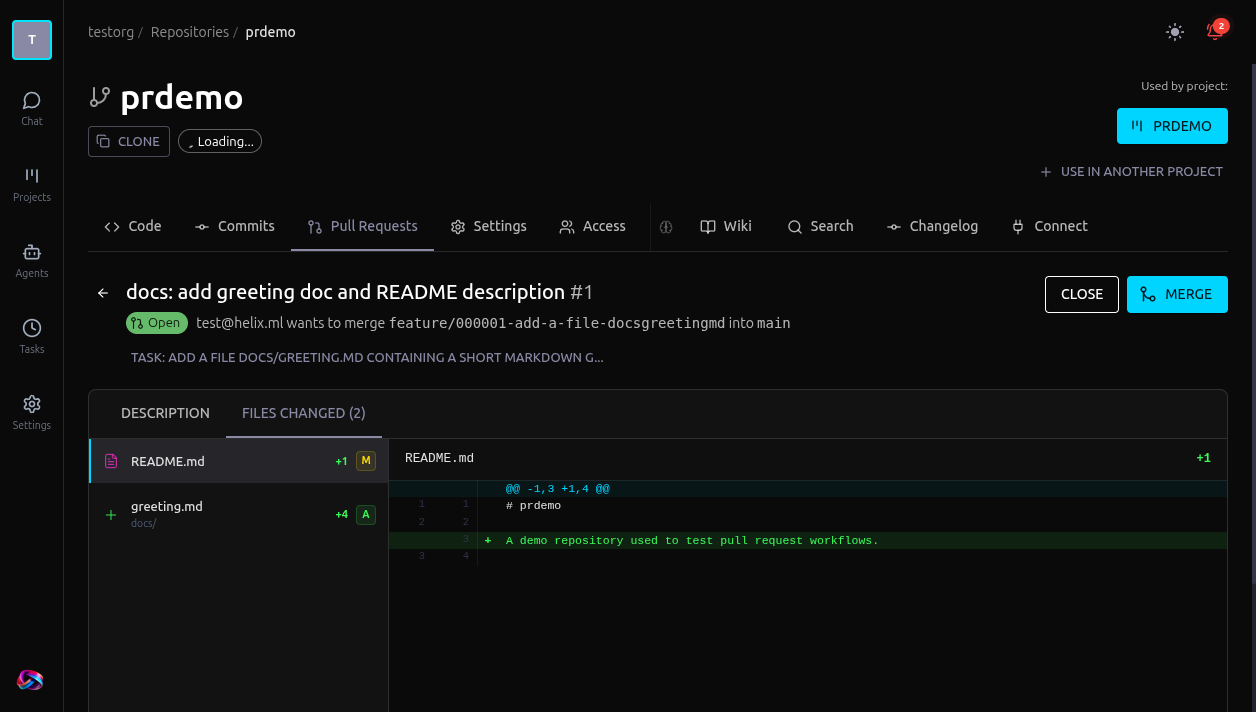
If the change clashes with something merged in the meantime, Merge is disabled and Ask agent to rebase sends the agent back to fix it. Once it has, the pull request can be merged again.
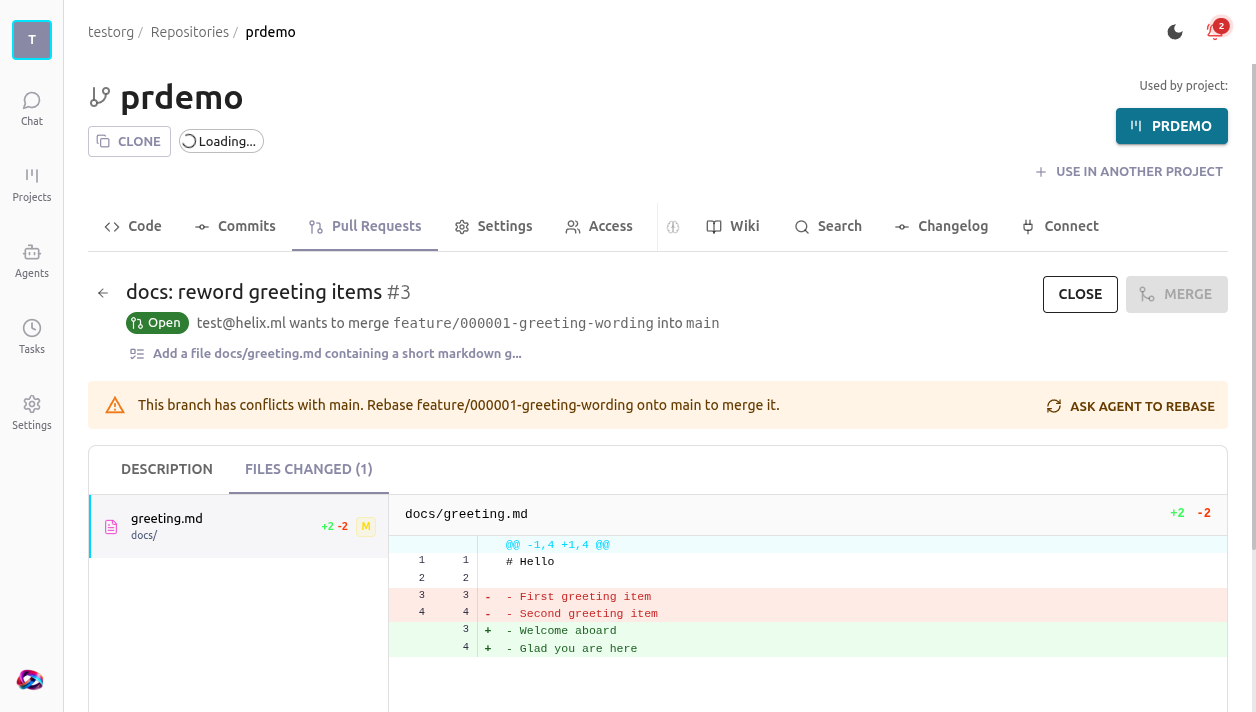
Merging deploys the new version. The strip moves to Live, and everyone who has the module installed gets it.
5. Change it later
Two ways to ask for a change, and both start a new agent task:
- On the module page, type into Describe a change and click Change this module.
- On any of the module's pages, click Change this module at the top. The agent is told which page you were on, so "add a column here" is enough.
Then it's the same loop: watch, preview, review, merge.
Read what the module's agents do
Many modules run agents for you. Candidate Search, for example, runs a sourcing agent on your LinkedIn Recruiter seat. Each of those agents follows a runbook: the written instructions it is given when it starts.
Modules built from the template show their runbooks to everyone who uses them:
- A Runbooks entry in the sidebar lists every agent the module runs and what each one is for.
- Wherever you start a run, Read the runbook opens it before you commit.
- On a running agent, View runbook shows what that agent was told.
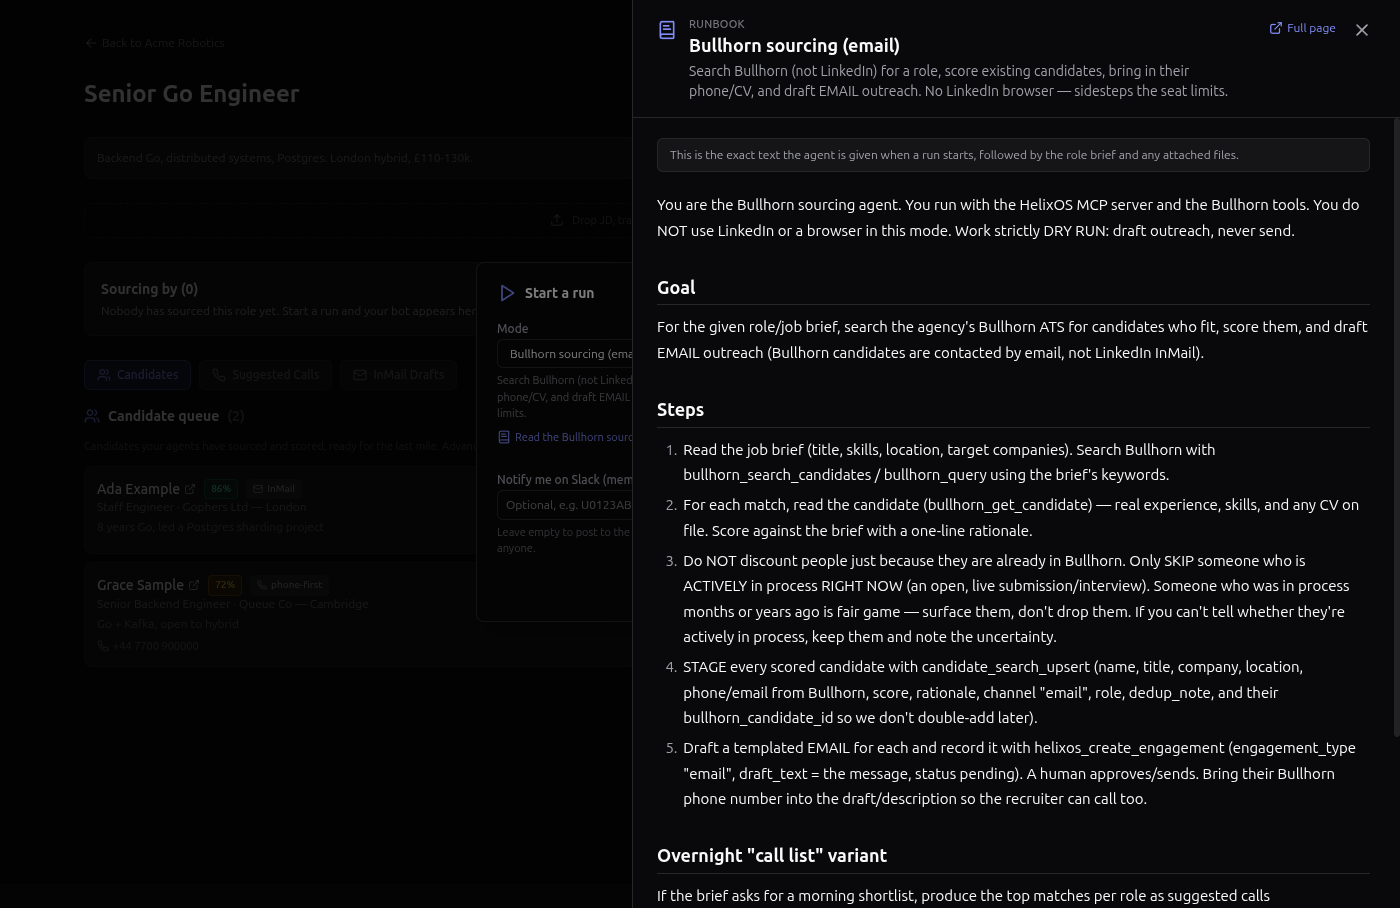
What you read is exactly what the agent gets. The runbooks are plain text files in the module's repository, so a change to an agent's behaviour shows up in the pull request like any other change, and you can review it before it goes live.
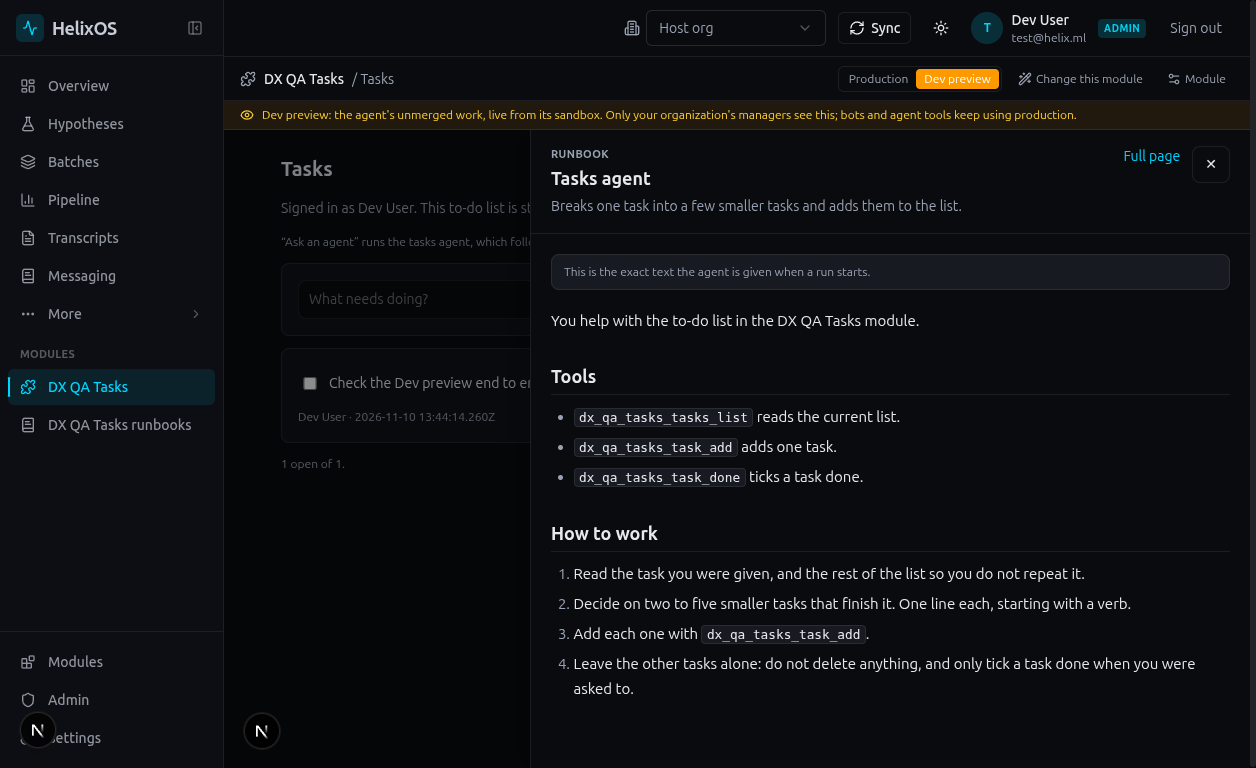
How a module fits together
You can skip this section. It's for the person who will read the code.
- A module is a small web app in its own Git repository. The template uses Go with PocketBase for the server and data, and Next.js for the pages. Any language works, as long as the app serves three things: its pages, an API, and a manifest file that tells HelixOS its name, sidebar entries and tools.
- It runs as its own web service, separate from HelixOS. HelixOS shows its pages inside the HelixOS window and passes it a short-lived token saying who is signed in.
- It keeps its own data, separated by organization.
- Its agent tools are an MCP server inside the module. When an agent in HelixOS calls one, the call goes to the module, so the agent can read and write the module's data.
- When the module wants an agent to do something, it asks HelixOS to start one, and HelixOS runs it in a Helix sandbox.
The module template has all of this wired up, with an AGENTS.md that explains it to coding agents.
Build a module with Claude Code on your own machine
Everything above happens inside HelixOS, and an agent does the coding. You can also work on a module on your own computer with a coding agent such as Claude Code, Codex or Cursor. The module behaves the same either way.
What you need
- Go 1.27 or newer, Node.js 22, and git.
- A coding agent, for example Claude Code.
- No HelixOS installation. The template comes with a stand-in for HelixOS.
Get the code
- A module you already created in HelixOS on GitHub or GitLab: clone that repository.
- A brand new module: on GitHub, open helixml/helixos-module-template, click Use this template, and create a private repository. Clone it.
Run it
In the repository, run:
./devThen open http://localhost:8090. It shows the module signed in as a test user, with some example data, the same way HelixOS would.
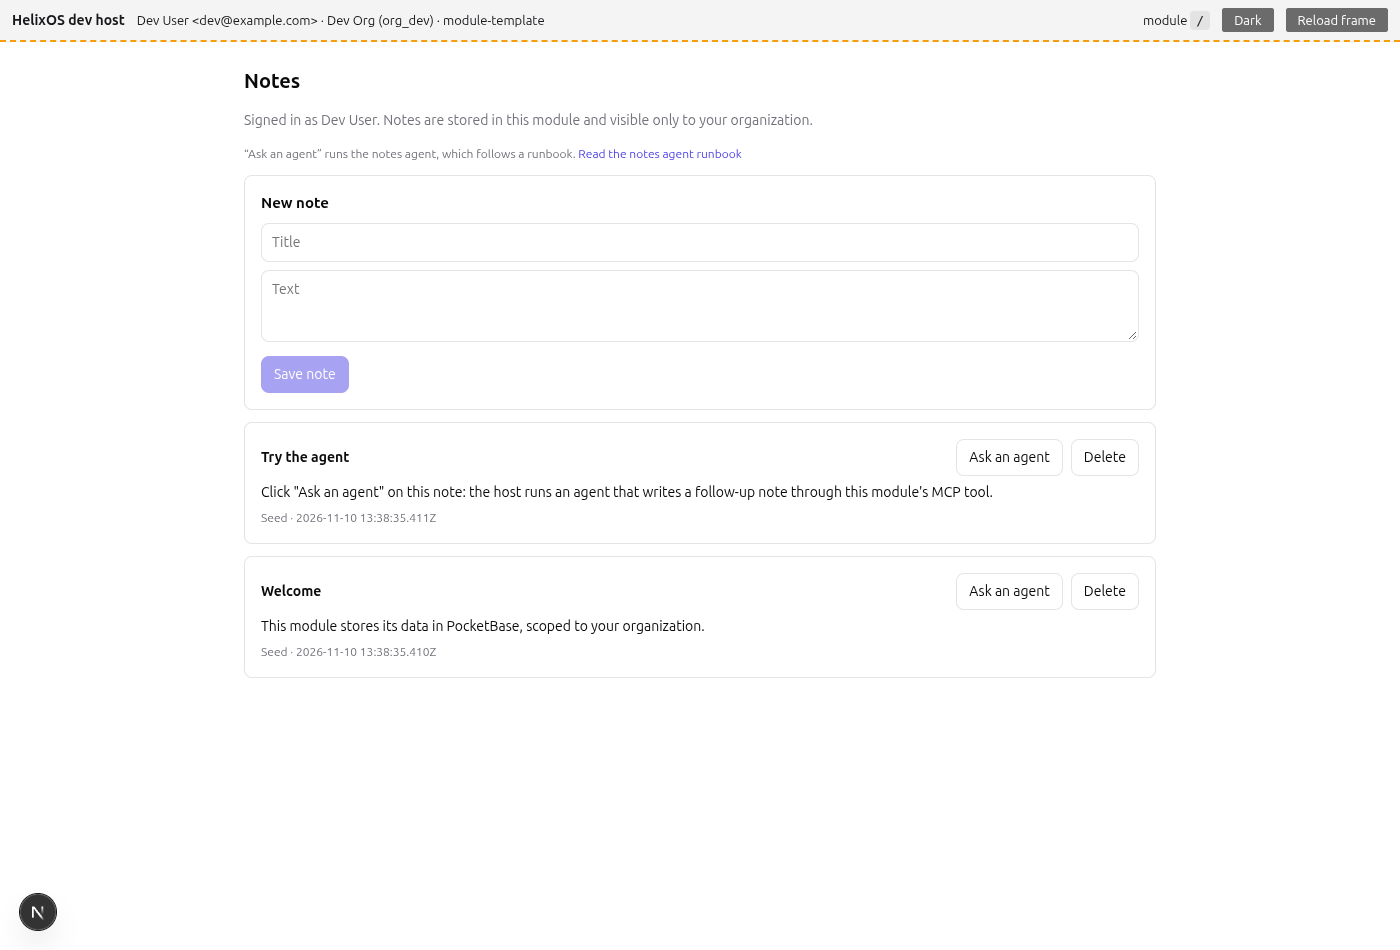
- Edit a page and it updates in the browser straight away.
- Edit the Go code and the server rebuilds and restarts by itself.
- Agent runs don't work locally (there is no Helix sandbox to run them in). The module says so if you try. Use Dev preview in HelixOS for that.
Work with Claude Code
Start Claude Code in the repository and tell it what you want, for example:
Read AGENTS.md. Turn this into an interview scheduler: a page listing each
candidate's interview slots for a role, and an agent tool that proposes times.
Keep the module key interview-scheduler. Check it in the browser at
http://localhost:8090 and run ./selftest before you finish.
AGENTS.md tells the agent how the module is put together and the rules it must keep, such as storing every record against the organization it belongs to. Two habits keep things clean:
- Put any instructions for the module's own agents in
runbooks/as markdown, never inline in code. That way people can read them in the module. - Run
./selftestbefore every change. It checks the server, the pages, and that the module still works with HelixOS.
Put it live
- The module is already in HelixOS: push a branch and open a pull request on GitHub or GitLab. When you merge it, Helix deploys the new version.
- The module is new: push it to your repository, then in HelixOS go to Modules → New module, choose GitHub or GitLab, and pick Use an existing repository with its URL. HelixOS sets up the deployment and you continue from step 2 above.
To pick up later improvements to the template, run scripts/update-from-template. It merges the latest template into your module and stops if anything conflicts, so you can resolve it yourself.